shark party diy giveaways

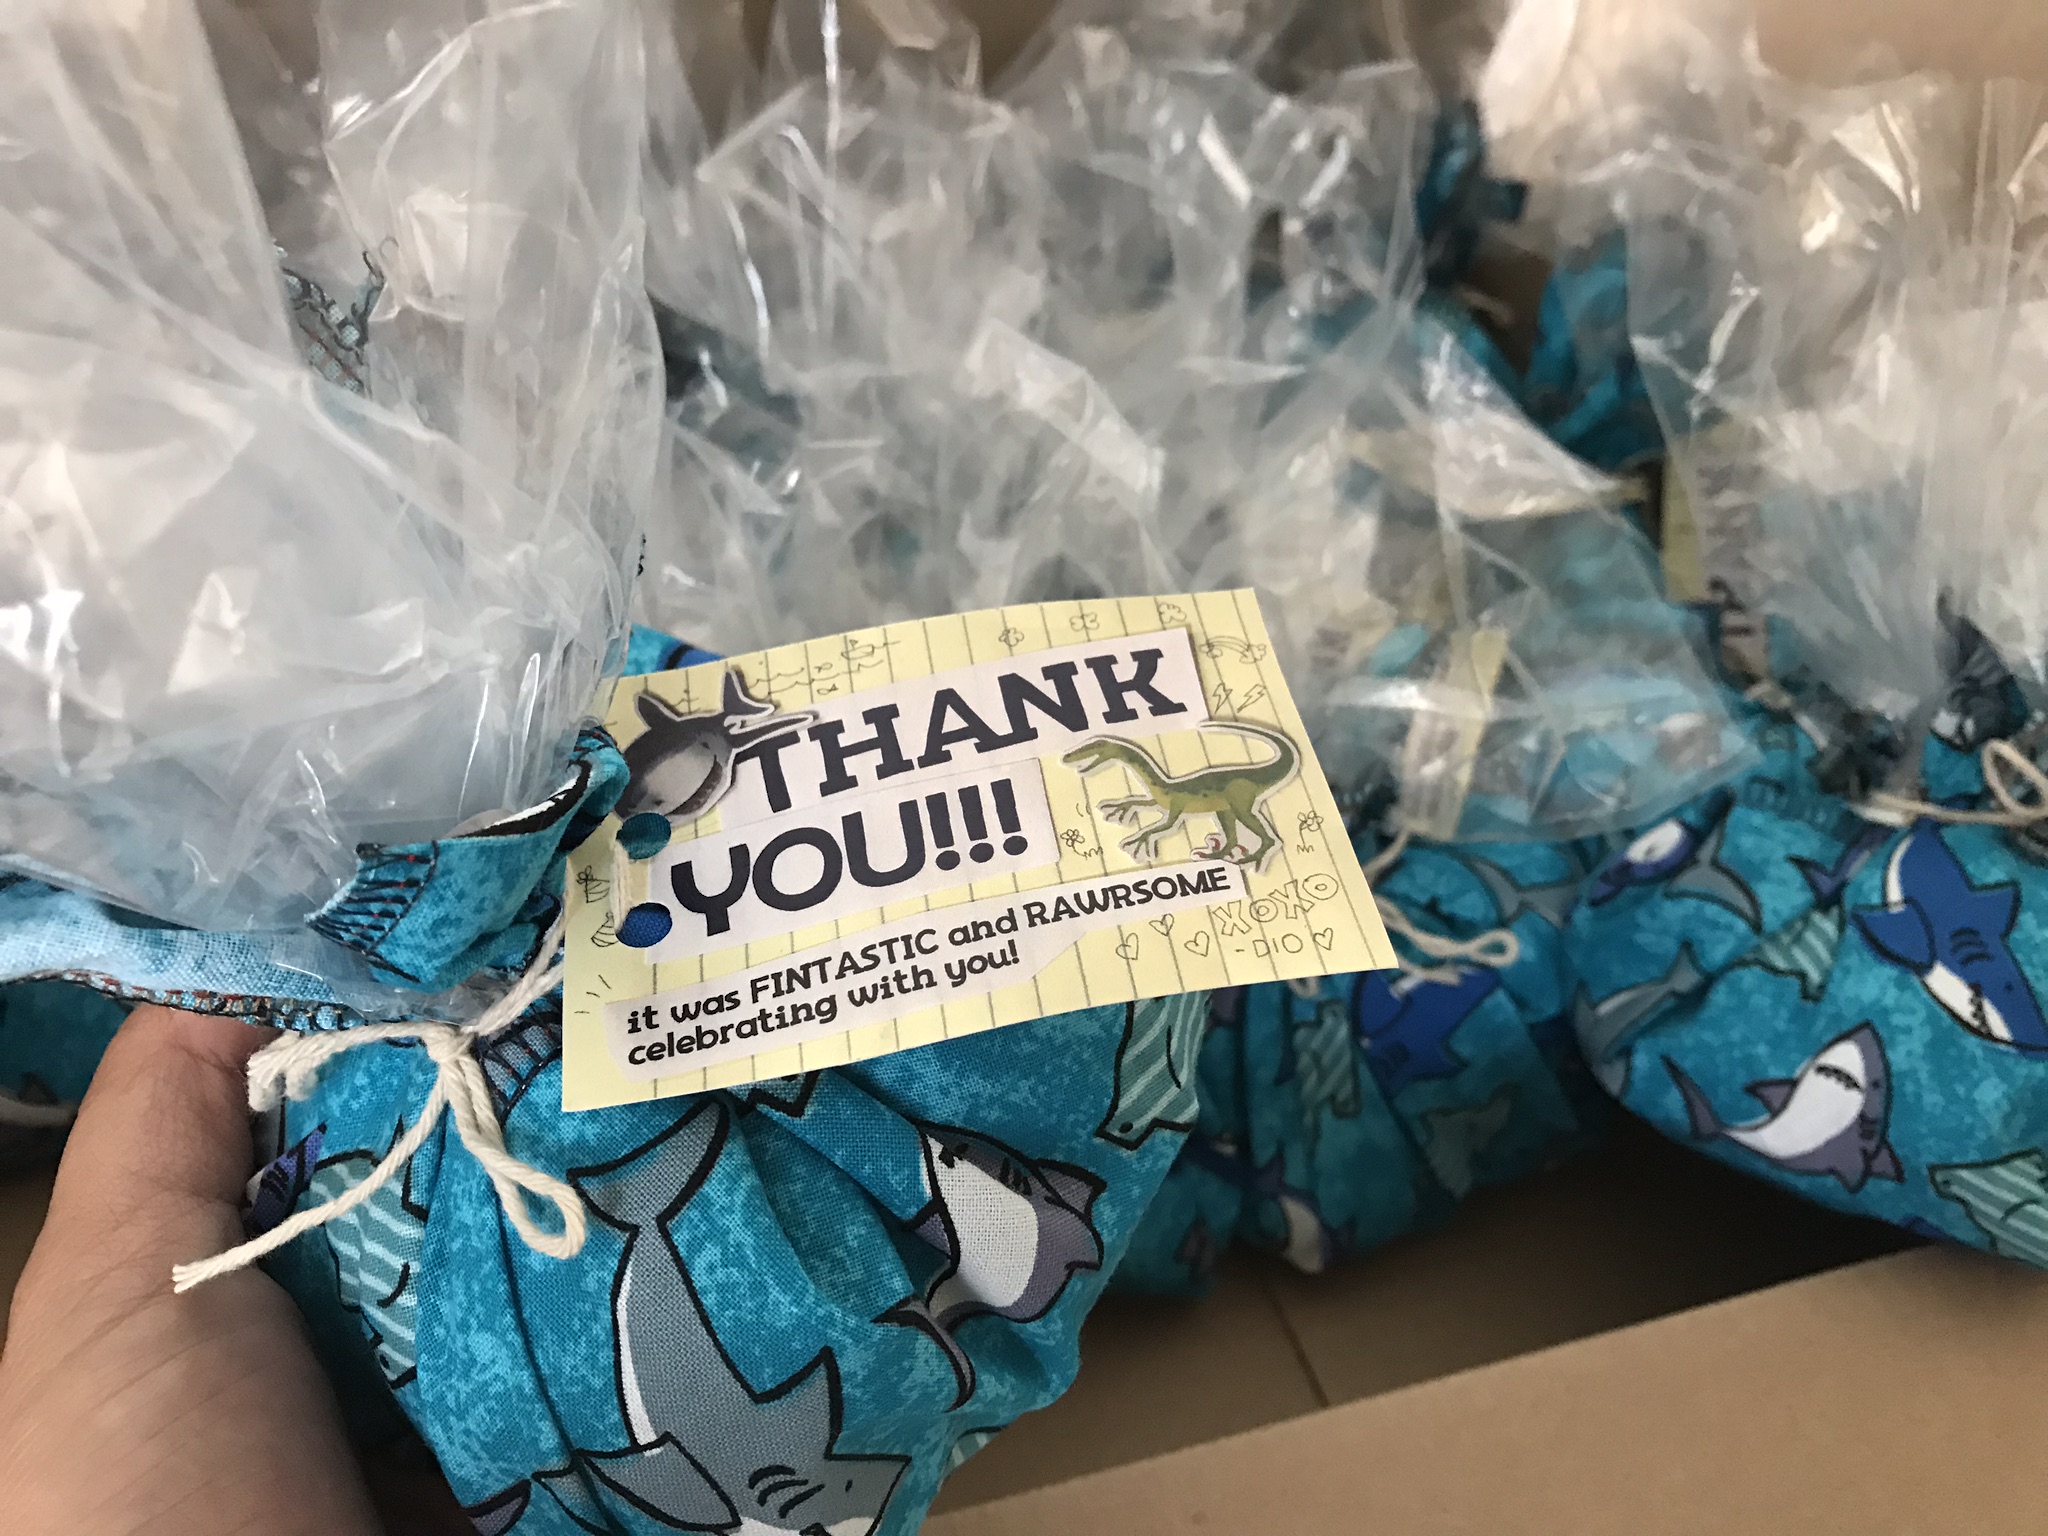
Our Diosaur has been obsessed with dinosaurs and sharks so for his 2nd birthday we went for a dinosaur and shark theme, but really more shark. We found a pretty rad shark fabric so I sewed little baggies to hold the candies and little toys together. The bags actually doubled as a bandana since I added little snaps on them to secure them together. I also made sea creatures plaques for each kid. We tried our best to match the sea creatures with the kids personalities to make them really special.

IMG_1145.jpg

Here's a simple DIY of the sea creature plaques:

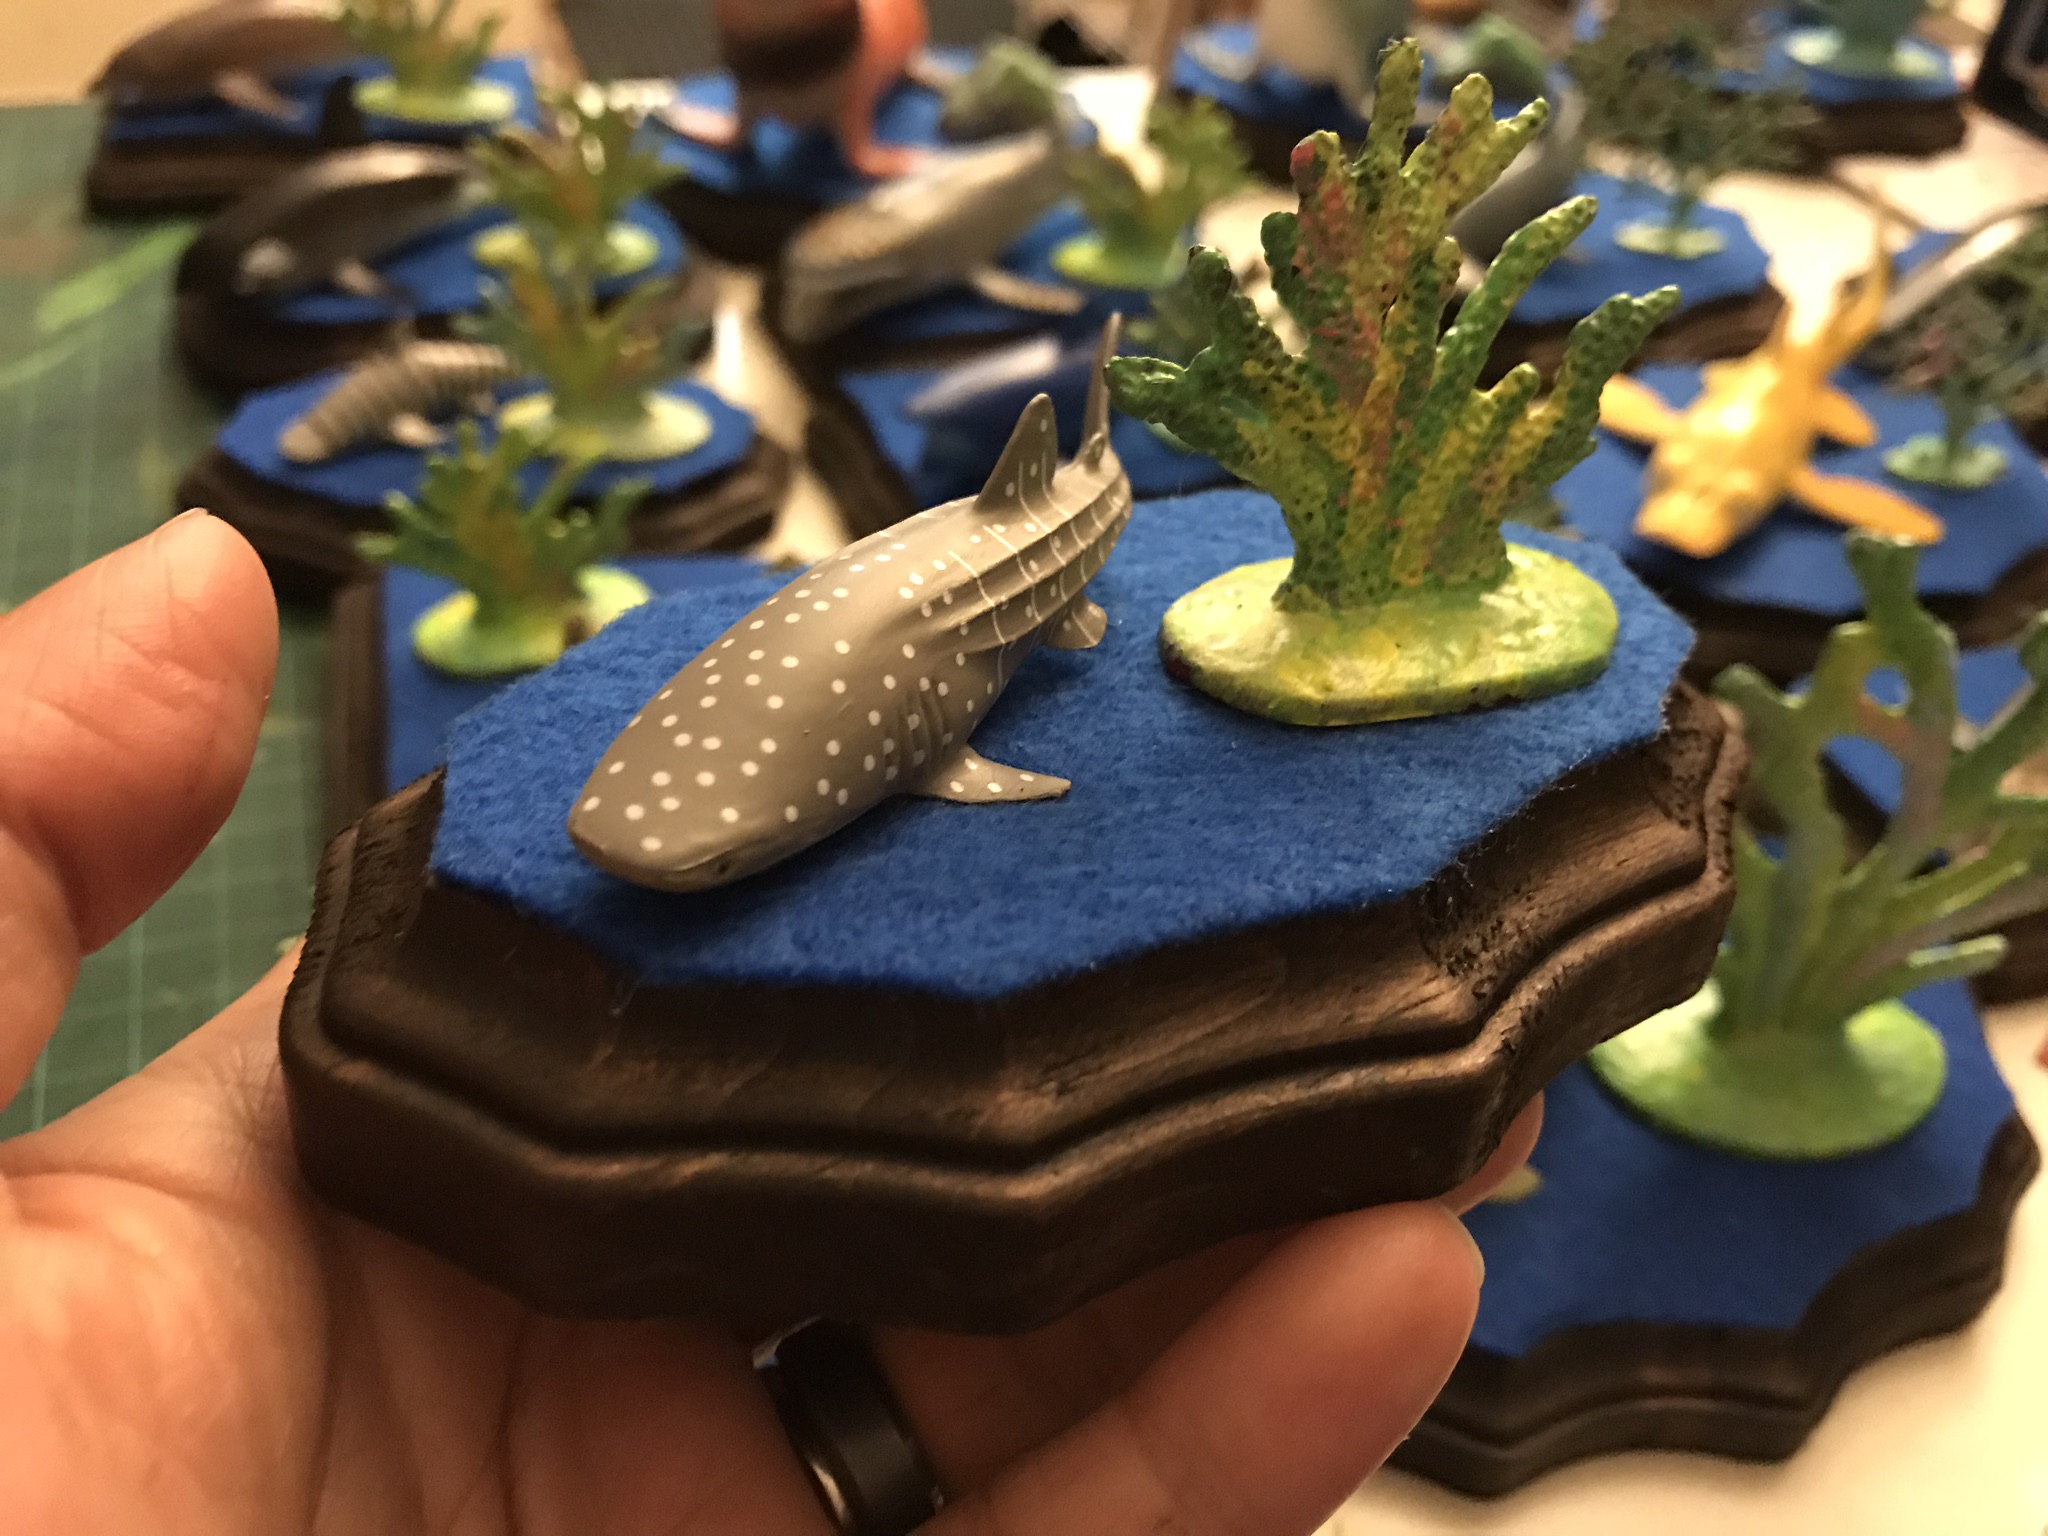
I bought these wood plaques at Michaels and they range from $0.59-$1.99. 

IMG_0842.jpg

Stain the wood plaques. Make sure to wear gloves and do it in a well ventilated area. I only used a little bit because I still wanted some of the wood grain to come through. 

IMG_0885.jpg

With primer, paint rocks/ corals/ stones or other accessories you want to add to the plaque. Ours came in bright colors so I painted them gray and speckles of white to add some texture and make them look natural. Then, I used acrylic paint to add more bright colors to the rocks and corals. 

IMG_0851.jpg

Cut felt to act as the "water" base of the plaque. This is optional if you want to glue the items directly to the plaque. I used spray adhesive to attach the felt to the wood plaque to have a smooth surface. 

Arrange the creatures with their accessories. Use glue gun to secure them on the felt and make sure to add a lots of it. Since the sea creatures were smooth plastic, they often came off so just make sure to keep adding glue or hold them in place until they feel secure. I ended up adding glue on top of the creatures to make it look like it was water and to also add more security to the plaque. 

IMG_1112.jpg

I printed out the kids names and used double sided foam to attach it to the plaque. 

IMG_1146.jpg
IMG_1149.jpg

Ta-da! Pretty simple and they look pretty awesome. I'm sure using any kind of plastic toy and different materials would look pretty cool too. The kids loved them and I had lots of fun making them. 

Stay rad! 

-Nika B.

dapper day at the natural history museum

Here's some photos of our little family enjoying the dinosaurs and all the rad artifacts in the museum in our dapper custom made matchy-matchy dinosaur outfits. We were also lucky enough to be featured on Dapper Day's instagram and were chosen by Natural History Museum as their January's How Do You Museum contest winner. 

dapper day diy outfits for the natural history museum

This Sunday is Dapper Day at the Natural History Museum. I've never been to the Natural History Museum and I've always wanted to go to Dapper Day so it was a perfect opportunity for both. 

Being the extra mama that I am, I decided to DIY some of our outfits and accessories. I took my dudes with me to Joanne's to pick out some fabric and found these two pretty rad ones. I had to get the second blue fabric because they only had 2 yards of the dinosaur one, but having a more subtle fabric worked out to ~compliment~ the dinosaurs. 

I made the following:

me: pillbox hat, necklace, full skirt, shoes

Diosaur: little vest, bowtie, pocket square

Alex: bowtie, pocket square 

Skirt: I knew I wanted a full skirt so I found a bunch of tutorials online and used this site to calculate the math part. I taped grocery flyers together to make the pattern for the skirt since I knew I needed a big piece of paper. I transferred the pattern to the fabric and started pinning the pieces together. I sewed the pieces together and my mom helped me serge the bottom of the skirt which made it so easy for me to hem the bottom. She also helped me put the waist band and the zipper. I used these snaps to close the skirt. 

IMG_0054.jpg
IMG_0053.jpg

Bowtie and vest: I used a vest that Dio had as a pattern and followed the same steps as the skirt. I found this pattern online for the bowties as a guide. I ended up deconstructing the finished tie because we couldn't figure out how to tie a tie haha. I made the tie and hand sewed it so it would stay permanently and used another strip of fabric as a neck strap. 

IMG_0038.jpg
IMG_0040.jpg
IMG_0047.jpg
IMG_0048.jpg

Hat: This is probably the 4th pillbox hat that I've made since they're pretty easy to make. I used to sew the fabric together, but I just used spray adhesive to secure the fabric to the cardboard which was easier and cleaner too. I used a chocolate box as the base and then wrapped the fabric around it. I traced 2 pieces of the round top and a 2 inch strip for the base. I wrapped the strip around the round piece then wrapped both pieced with fabric. Then I wrapped the other round piece and finally glued it on the base. It's important to cut little ~triangles~ on the edges-both the fabric and whatever your'e using as a base- to make sure that it doesn't pucker when wrapping around the corners. I wrapped more of the box with fabric in different sizes. I found this perfect triceratop at the 99¢ store and finished it off with this scrap of fabric I had. 

IMG_0024.jpg
IMG_0025.jpg
IMG_0027.jpg
IMG_0028.jpg
IMG_0029.jpg

Necklace: This dinosaur came with the triceratop from the hat. I wanted it to sit flat on my chest so I cut the other side with a utility knife. I just added the dinosaur and the flowers from another necklace to a bib necklace with thread and some thin wires. 

IMG_0017.jpg
IMG_0018.jpg
IMG_0033.jpg

I found these blue suspenders on amazon and these gloves randomly at a Korean super market. 

IMG_0061.jpg

Tada! Overall it was fun challenging myself to make something new and repurposing things I already had around the house. 

I'll post more photos of the actual event soon with our matching outfits. 

Stay rad!

-Nika 

quinceñera diy items

As promised here's a couple of items that we DIYed for Juddie's 15th. 

The whole process was super simple so don't hesitate to make your own and take inspiration from them. 

The top part of the centerpiece was a lot of fun to make because I love repurposing and recycling ordinary items into weird and unique items. Here's the breakdown of what we did:

•record: swap meet. We bought 30 records for $20 from one of our favorite swap meets-Goldenwest in Westminster. We painted all of them ~*sea mist*~ to match the color theme of the 15th. 

•cds: home. I'm sure we all have tons of CDs laying around that we secretly don't want to throw away. We painted them silver glitter which came out really shiny and had a chunky glitter texture. Some of the cds had dark bases so we had to paint them white then spray them with the silver. 

•cassettes: home. Samesies with the cds laying around, of course I made sure to keep my Motley Crue and Stevie Nicks out of the 'will paint' pile. We used this black glittery outdoor paint which looked great. 

•folded paper fan: home. I printed a ton of these and we all sat down folding and gluing them together while we watched The Walking Dead.

•foam flowers: downtown LA.  I think we bought 6 dozens for around $20. My dude's mom sprayed them with hairspray and sprinkled glitter to add some sass.

•random accessories: sister-in-law. She had a bag full of random earrings, buttons, and weird stuff that she figured I'd be able to use for something and she was right. The accessories added personality and an extra layer of weirdness. 

•diamond wrap ribbon: I don't remember how much it costs but I'm sure it was less than $10 for a looot. They also come in different colors so there's tons to choose from. 

•spray paint: Home Depot. I think we bought 4 cans per color because we had to make 35 centerpieces. Yeah, 35! 

•glue gun, E6000: home. I use this stuff on everything! 


This was incredibly easy to make but took a lot of steps since we had to assemble the pieces in order. Again, most of the materials are from Downtown LA-that place is the best! Here's the break down of the process and where the materials came from:

•giant paper clip: 99ç store. We had to paint some of them white because we had different colors.

•printed paper fan: home.  

•foam flowers: downtown LA. 

•glitter: downtown. It was a huge bottle that cost 7 bucks. We probably used 1/3 of it. We placed them in old salt and pepper shakers to make the sprinkling a lot easier but of course our whole place was glittering for months.

•styrofoam disk: downtown LA. These disks were 1inch thick and come in different sizes and can easily be cut. 

•diamond wrap ribbon: downtown LA. 

•wires, glue gun, E6000: 99ç store and Michael's. We used glue gun and thin wires (ornament wires actually) to secure things around the styrofoam disk. 

The court corsages was easier than I thought. I used the same materials that we already had. I used pin backs for the dudes' and used elastic on the girls'. These would be perfect for weddings, proms, or any fancy events. Since the flower is artificial, they can last fooorever! 

These masks were used during the baile de surpresa - surprise dance. We bought these masks at downtown, 20 for $10. Total deal. 

Juddie used this vest in one of their dances. I used elements from the invitations to make things cohesive and cuuute. I printed these on iron on and transferred it on white felt fabric and sewed them directly to an old vest that I had. Ta-Da! Instant 15th tough girl denim cut. 

You can take a look here to see the invitation and cards that I made for the 15th.

Hopefully this post has inspired you to make your own or simply continue to customize your own stuff-fancy party related or not! 

Stay cool and rad. 

-Nika B.


face swap tips

This weekend was my brotha David's, 25th birthday celebration. There was a secret surprise picnic followed by another secret surprise archery party. I wanted to play tribute to his new found passion-archery, so I made him into famous archers and here's some stuff I learned along the way.

QUICK TIPS FOR FACE SWAPPING:

GOOD PHOTOS

=This is probably the most important because, duh, you're swappin' faces! Try to get both faces to have the same profile: looking up, straight forward, side ways, whatevaaa. The closer they are, the easier it and for realzies it will look.

-Davryl hunting walkers

-Davryl hunting walkers

INCLUDE DETAILS

=Include as many details of your person as possible. Glasses and facial hair are super helpful to recognize their face. Don't worry too much about their hair because it will probably be covered or erased. 

-the hair on these are too good, especially Meri-David

-the hair on these are too good, especially Meri-David

•ADD DETAILS

=They say, "the devils are in the details," because little tiny devils sneak themselves in cracks and tiny spaces because they like small and hot areas. JK. These details include adding highlights and shadows and making sure the whole thing looks cohesive. 

-I erased and added shadow to make it look more real

-I erased and added shadow to make it look more real

BLEND TOGETHER

=This is where the magic happens! Make sure that both skin tones match so make it look really realistic. I used photoshop so I had control over brightness, hue and saturation, and even color balance. Use all the filters if you have to!

-these are my favorite because of his expressions

-these are my favorite because of his expressions

•FUNKY FACE

=Faces with funny expressions combined with serious poses make the best face swaps. Duck lips, big smiles, and straight up funky faces transforms any pose into a life-size poster worthy piece. The funkier the funnier. 

The likeness is uncanny. David and the rest of the gang thought it was HILIARIOUSSS. I had to take a break from a couple of them because I just couldn't stop laughing. Coincidentally, the place had almost the same posters that I made so it was even more hilarious.

-Oli-Vid, Meri-David, and Robin Hoo-David

-Oli-Vid, Meri-David, and Robin Hoo-David

-Legola-Vid, Kat-Vid

-Legola-Vid, Kat-Vid

-aaand the whole gang

-aaand the whole gang

Do you have any great face swaps? I would totally love to see a mashup of people's faces. 

Stay cool. 

-Nika B.

quinceñera lessons learned

This Saturday was my dude's sister's quinceñera and it was definitely a great experience to be a part of. Lots of planning, running around, and making things from scratch. My kinda party. I was in charged of most of the decorations and photography so here's some of the things that I've learned that will hopefully help you out with your next event-big or small.

QUINCEÑERA LESSONS LEARNED:

•PREPARATION IS NUMERO UNO

=I'm a big list maker so I made different lists as the day got closer. I could refer to the list whenever I felt overwhelmed or a little too comfortable with things. I had lists of things I needed to make, things I needed to do, materials, and everything else that I needed to remember.  We started working on the decorations months waaay before the date so we weren't panicking last minute. Plan things accordingly and give yourself lots of time to work on things-either buying and ordering stuff or DIYing everything. 

-pages of tiny notes and lists.

-pages of tiny notes and lists.

•ORGANIZATION IS ALSO NUMERO UNO

=I am definitely organized and my lists totally helped. We put things in ziplock bags in boxes and made sure to label what was in it. The decorations were separated and labeled correctly. The clean up was a lot easier since we knew where the scissors, fabric, and random stuff went. Label all the things!!! 

-boxes with labels and zip locks.

-boxes with labels and zip locks.

•TAKE LOTS OF PICTURES

=We opted out of hiring a photographer to save some money so my dude and I were running around the whole night taking pictures. Down side is that we're barely in any pictures. Oh well. Tip: take a picture with every single table to remember who was there and who to thank. We totally forgot this part but hopefully the videographer caught the crowd. 

-the only pictures of me, and my dude with his sisters.

-the only pictures of me, and my dude with his sisters.

•THINGS WILL GO WRONG

=This was my first quinceñera so I wasn't completely sure what to expect but judging from Juddie's frustrated face and people running around, I knew things weren't going as planned. The DJ announced the toast too early so we took a deep breath and solved things little by little. We went around the tables and distribute glasses, champagne, and ciders. Wearing flats instead of heels was definitely a good idea. Next thing we knew, we were toasting for the little lady.

-quinceñera looking all grumpy and the after look of the night.

-quinceñera looking all grumpy and the after look of the night.

•HAVE FUN

=I was freaking out a little inside because things weren't going as smoothly as planned but then I thought these people probably don't care, they'll forget, and I'm being too harsh on myself. Whatevaaa. At the end of the day, all it really matters is that you have fun or whoever you're celebrating for. I asked Juddie's mom if she was having fun and she replied, "No, but as long as Juddie's having fun then I'm happy." It was the sweetest thing evarrr. The quinceñera did have fun and all her friends said that the party was "turnt up." 

-cheesy jumping pose.

-cheesy jumping pose.

-photo booth fun.

-photo booth fun.

-quinceñera and her court.

-quinceñera and her court.

There's definitely things that I wish I would have done differently but like I said-things will go wrong. Keeping this list in mind will definitely help me out the next time we throw a ginormous party again and maybe this list will help you out as well when you throw your own shindig. 

I'll have a separate post that shows all the rad DIY stuff we made for the quince. Boooyah!

Stay cool. 

-Nika B.

hello friendz

Hello! I'm Nika B., the main piña of PIñANIKA

I'm passionate about equality, design, craft, jiu-jitsu, and of course, pineapples. 

I am a full time graphic designer and working my way to full time crafter. I've always loved working with my hands so this blog is a way for me to do what I love while sharing it with others. Shrinky dinks are my all time favorite thing to work with but I also like working with fabric, clay, paint, and random stuff. 

I'll be posting things that interest me from: my crafts, diy projects, easy recipes, occasional outfits, grrrl power motivations, maybe even kick ass jiu-jitsu moves, and other radical things. 

Feel free to message me for any questions or just chat about your favorite ice cream. 

Stay cool. 
-Nika B.